Landscape fabric can keep weeds at bay, making maintaining your garden and greenhouse beds easier. Installing landscape fabric is a straightforward process, but you'll want to familiarize yourself with the steps.
This guide will teach you how to use landscape fabric. We'll also walk you through each step of the installation process, ensuring that you complete your landscaping project quickly and efficiently.
How to Use Landscape Fabric
Landscape fabric is a tightly woven mesh material that's best used to prevent weed growth. For example, you can use it to keep weeds from growing through gravel pathways, garden beds, or dirt-floor greenhouses. But preventing weed growth is only one of the benefits of landscape fabric.
Benefits of Landscape Fabric
There are several benefits of using landscape fabric. Some of the most notable of these benefits include:
- Fewer weeds
- Improved moisture retention
- Reduced soil erosion
- Decreased need for herbicides
If you're unsure whether landscape fabric might be a beneficial tool for your garden, greenhouse, or yard, be sure to consider these advantages.
Fewer Weeds
The primary purpose of landscape fabric is to stop weed growth for extended periods. For example, many landscape fabrics last between five and ten years before degrading.
This layer of protection makes it far easier for gardeners and landscapers to keep areas weed-free. With landscape fabric in place, you won't need to spend several hours pulling weeds from garden beds or gravel pathways each week.
Improved Moisture Retention
Though landscape fabric allows moisture to drip through and seep into the soil beneath it, this process is often very slow. As a result, garden beds placed atop landscape fabric can retain moisture for extended periods.
This feature is helpful when growing plants that require high moisture levels. It's also valuable for those living in dry areas that don't see much rainfall.
Reduced Soil Erosion
Soil erosion can cause your yard or plant nursery to lose precious soil. Over time, it can expose plant roots and alter the landscape of your outdoor area.
Landscape fabric helps prevent erosion by securing and covering the soil. Wind and rain are the two forces contributing to soil erosion, but landscape fabric is tough enough to resist them.
When your soil is protected, your garden is more likely to thrive.
Decreased Need for Herbicides
With landscaping fabric in place, you may not need to spray your garden beds, pathways, or greenhouse floors with herbicides. Not only are many commercial herbicides deadly to plants, but they can also prove toxic to humans. For this reason, landscape fabric is a healthier, safer, and eco-friendly alternative to herbicides.
Installing Landscape Fabric: What You'll Need
Before you begin your installation project, you'll want to ensure you have all the tools and supplies necessary to get the job done, including:
- Landscape fabric
- Ground cover anchoring pins
- A tape measure
- A leveler
- A rubber mallet
- A garden rake
- A shovel
- A garden hoe or leveling rake
- A wheelbarrow
- A box cutter or pair of utility scissors
- Thin wooden dowels
- A spool of thick yarn or string
- Mulch
Landscape Fabric Installation: Step-by-Step
To install landscape fabric, you'll want to:
- Measure the area you'll be working on
- Purchase landscape fabric and project tools
- Gather tools and supplies
- Prepare your garden soil
- Roll out the landscape fabric
- Secure the material with anchoring pins
- Cover the landscape fabric
1. Measure the Area You'll Be Working On
The first step of landscape fabric installation is measuring the area you'll be working on. You can do this in several ways, but one of the best methods is marking your work area with wooden dowels and string.
You can mark the perimeter of the landscape fabric area with the dowels, then tie a line of string to each dowel to form a visible border. While this isn't entirely necessary, it can help you visualize your project area and make it easier to measure.
Of course, you can forego the dowels and string and use a measuring tape (with a push lock) to calculate the rough area of your project space. Be sure to keep a notepad or tablet handy during this step to record your measurements.
When you've measured the perimeter of your project space, you'll need to calculate its area. If your installation space is square, rectangular, or another standard shape, you can use an area calculator.
But if you're working with an irregular multi-sided shape, you might need to divide the space into squares, rectangles, or triangles to determine its total area. Again, be sure to calculate each figure separately before adding the total together.
Once you've figured out the area of your project space, you can purchase an adequate amount of fabric to cover that area. Remember, if you're planning on installing the landscape fabric several inches below ground level, you'll also want to account for depth.
2. Purchase Landscape Fabric and Project Tools
Landscape fabric comes in rolls that vary in size from 3ft wide and 100ft long to 15ft wide and 300ft long. The right size for your project depends on the total area of your installation space.
For example, let's say that you're preparing a rectangular garden bed that's 10ft long and 6ft wide. The area of this space is 60ft, so you'll need to purchase a roll of landscape fabric of a similar size.
In this hypothetical scenario, you'd likely want to purchase landscape fabric with a length of 6ft and a width of 20ft or less. That way, you can unroll the fabric onto the project area without creating sequential layers.
If you can't find a small-dimension fabric roll for your project, you might want to choose the closest possible option. Farm Plastic Supply offers two types of landscape fabric, each of which comes in multiple lengths and widths.
Though you might end up with unused excess landscape fabric, you may be able to utilize this material for future projects. Besides, you can cut your landscape fabric to size with a box cutter or pair of utility scissors!
3. Gather Tools and Supplies
After acquiring your landscape fabric, you'll want to gather the necessary tools and supplies to complete the installation project. For example, you'll want to have anchoring pins, a shovel, a garden rake, and a leveling rake on hand.
If you're installing landscape fabric several inches beneath the soil surface, you'll also want to have a wheelbarrow handy.
4. Prepare Your Garden Soil
The fabric installation preparation process is the most time-consuming part of laying down landscape fabric. That's because you'll need to clear away any pre-existing soil and vegetation and form a level surface for your material.
You might need to use your shovel to lift grass and soil away. If you're working in an area that's covered in dead leaves, you'll want to use your garden rake to gather the debris before you begin digging.
Once you've cleared the vegetation and yard waste away from your project area, it's time to level the soil.
If you're working on a small space, you may be able to level the soil's surface with the flat portion of a garden hoe. However, larger projects may require a leveler rake.
Use a leveler tool to gauge the slope of the exposed soil before you unroll the landscape fabric. Getting the ground as level as possible helps prevent flooding and soil erosion.
5. Roll Out the Landscape Fabric
When the bare soil is evenly compacted, you can unroll the landscape fabric and place it over the project area. Depending on the size of your project space and landscape fabric, you might need to apply several short vertical layers or a couple of long layers.
Be sure to secure the free end of the fabric with a weighted object like a tape measurer or leveling tool, then hold the roll and walk backward toward the opposite edge of the cleared ground. When you reach the perimeter, use a box cutter or pair of utility scissors to cut the fabric to size.
Then return to the top of the space, secure the new loose end with an object (you can also use a heavy rock), and begin the process again. Be sure that the edge of each new layer overlaps the edge of the previous layer slightly. Otherwise, weeds may find their way through.
Repeat this unspool-and-cut process until your project area is completely covered.
6. Secure the Material With Anchoring Pins
Ensure that your landscaping fabric hasn't formed any bunches and that it's lying flat against the leveled soil. After that, place an anchoring pin onto one of the fabric's corners.
The anchoring pin shouldn't be too close to the edge of the fabric, so try to position the pin two inches below both edges (if working with right angles).
Use your rubber mallet to drive the pin through the fabric. Continue tapping until the anchoring pin is flush with the terrain and material.
Repeat this action for each corner until the fabric is secured to the ground. Then work your way around the perimeter, placing a pin every foot along the border.
When the fabric is fully secured, you can cover it with soil, mulch, or gravel or position plants within the fabric matrix.
7. Cover the Landscape Fabric
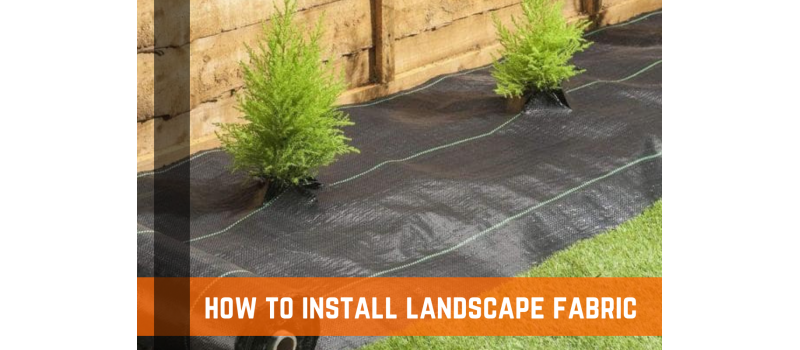
After your anchoring pins are flush with the ground and your landscape fabric is secure, you can begin to cover it with mulch, gravel, or soil. If you're installing landscape fabric at a shallow depth to protect a garden bed, you'll first want to use your box cutter or utility knife to cut small openings in the landscape fabric.
You can then plant your shrubs, flower, or vegetable within these gaps, ensuring that the roots are below the fabric. Finally, when you're satisfied with your plant placement, you can cover the visible portions of the fabric with a material of your choosing.
At this point, you've finished your installation project! You likely won't need to replace the landscape fabric for several years.
Frequently Asked Questions
Below you'll find some of the most frequently asked questions regarding using landscape fabric. If you have any lingering questions, you might find the answer you're looking for here.
Should I Use Landscape Fabric Under Gravel?
If you're hoping to repel weeds along a gravel pathway or driveway, landscape fabric can help. First, you'll want to measure the area you're hoping to cover, purchase enough landscape fabric to cover that area, and secure the landscaping fabric with anchoring pins.
After that, you can cover the fabric with gravel to obscure it from view. Depending on the type of landscape fabric you're using, the gravel area should remain weed-free for between three and seven years.
Where Can I Use Landscape Fabric?
You can use landscape fabric in any outdoor area. You can also use landscape fabric in greenhouses.
Landscape fabric is designed to stop weed growth and prevent weeds from rising into garden beds, dirt-floor greenhouses, or outdoor pathways. As such, it's a material with several outdoor applications.
Does Landscape Fabric Let Water Through?
Unlike plastic sheeting, landscape fabric is permeable. Consequently, it does allow water to pass through it.
That said, landscape fabric is tightly woven. Therefore, water that drips past the mulch, soil, or gravel sitting atop landscape fabric may sift through slowly.
So, while landscape fabric can increase flooding risks in areas with consistent rainfall, it can also improve soil bed moisture retention. This feature can be beneficial or detrimental depending on the plants sitting atop the fabric.
It's also possible to cut small patches out of landscape fabric. You can position plants into these holes, allowing their roots to access deeper soil levels while discouraging weed growth around the plants. This option helps prevent flooding and symptoms of overwatering.
Choose Farm Plastic Supply
Now that you know how to use landscape fabric and are familiar with the installation process, it's time to stock up on the necessary supplies.
Fortunately, Farm Plastic Supply carries several sizes of high-quality UV-resistant landscape fabric to help you get started. You'll also find anchoring pins to keep your landscape fabric in place.
Learn more about greenhouse and gardening supplies today by checking out our blog!

