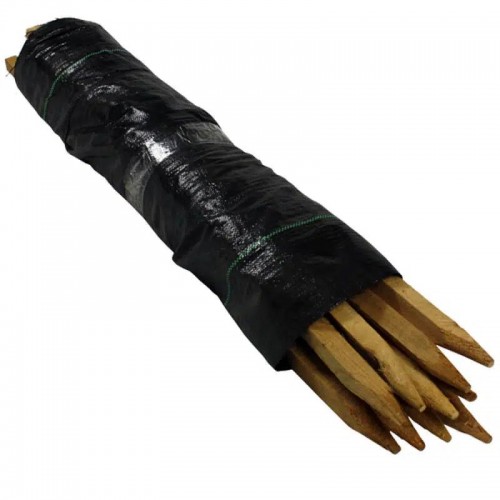
Keep Erosion in Check with Our Silt Fence
When it comes to protecting your land from erosion and sediment damage, our silt fence does the heavy lifting.
Crafted with durable woven polypropylene fabric, our fence stands up to the elements while keeping your site secure. Picture this: instead of soil and debris washing into drains or nearby waterways, our silt fence captures it, letting only the excess water pass through.
It’s a straightforward solution with a big impact – ideal for anyone looking to keep their property clean and environmentally friendly.
Product Information
The Dimensions of this product are 3' x 100' feet.
This Product Contains 11 4 Foot Stakes.
Each Stake is 4 Feet Tall.
Why Customers Choose Our Silt Fencing
You might wonder, “Why go with a silt fence?” Well, erosion control isn’t just about keeping soil in place; it’s about protecting the land and its natural resources.
Erosion and sediment aren’t just nuisances; they’re costly headaches when left unchecked. By slowing stormwater flow and holding soil in place, our silt fence minimizes runoff, prevents flooding, and keeps your site stable.
It’s a solution you can depend on to keep erosion – and related issues – under control.
Standout Features of Our Silt Fence
Now, let’s talk specifics. Our silt fence covers an impressive 3 feet by 100 feet, making it flexible for various site sizes.
Each fence is equipped with 11 sturdy 4-foot stakes that secure it firmly, even in challenging conditions. And that durable woven polypropylene?
It’s built to last, ensuring you won’t have to replace it after every rainy season. This isn’t your average fence; it’s built with purpose, precision, and performance in mind.
Silt Fencing: Your Solution to Sediment Control
Let’s face it: sediment is one of those things you don’t really notice until it’s a problem. And when it’s a problem, it’s a big one – clogging storm drains, damaging waterways, and creating costly environmental concerns.
Our silt fence captures that sediment right at the source, allowing water to flow through while holding back the debris.
It’s a smart way to avoid the hassle of runoff damage and keep the environment cleaner, all in one go.
Benefits You’ll Notice with Our Silt Fence
Our silt fence isn’t just about function; it’s about making your life easier by providing effective protection:
- Prevents soil erosion from rainfall, stormwater sheet flow, & channel flow
- Sediment Stabilization
- Soil Stabilization
- Environmental Protection
- Erosion Control
- Sediment Control
Fencing Applications
Our silt fence is perfect for a wide range of applications:
Applications
- Slope Stabilization
- Soil Reinforcement
- Support in Channels
- Land Restoration Projects
- Slope or Channel Erosion Control
- Slopes up to 2:1
- Low flow channels
Ideal for Slopes and Low-Flow Channels
Think of our silt fence as your first line of defense against erosion on slopes or in low-flow areas.
It’s well-suited for slopes up to a 2:1 grade, where controlling sediment can be a major challenge. By holding soil in place, our fence ensures you’re not fighting a constant battle with erosion.
Specifications & ASTM Test Methods
- Weight ASTM D5261
- Grab Tensile Strength ASTM D4632
- Grab Elongation ASTM D4632
- Trapezoid Tear ASTM D4533
- CBR Puncture ASTM D6241
- Permittivity ASTM D4491
- Water Flow ASTM D4491
- A.O.S ASTM D4751
- U.V. Resistant ASTM D4355
Step-By-Step Instructions For Installing A Silt Fence
Step 1: Lay Out a Path and mark the path for your Silt Fence, knowing that it is intended to prevent Silt from Washing Downhill off your worksite. You then install your Silt Fence in line with, not perpendicular to the contour of your site. Install the fence run below the areas you're disturbing. Also avoid creating U-Shaped fenced-in low spots where rainwater and sediment could collect there.
Step 2: Dig a Trench for the entire run of your Silt Fence that is at least 4 inches deep. A V-Shaped trench is the easiest if you're digging by hand. But a 4"x4" square trench works as well.
Step 3: Set the Stakes as you move along burying the bottom of the silt fence fabric, pound the fence stakes into the ground every eight feet. We used a 10-lb. maul. Silt fence should stand at least 14 inches above the ground; check the regulations in your area. Where two sections of silt fence meet, overlap the fence ends to cover a span of two posts.
Step 4: Backfill the Trough you dug and make sure the uphill side of the silt fence fabric is buried and underground. Use a Compactor and Tamp the Soil firmly over the fabric. You don't have to place the dirt behind the fabric and the stakes. Just make sure that all of the stakes are solidly in the ground to keep the fence from collapsing and causing damage to the area that you are working in.
Protect Your Land with Our Silt Fence – The Smart Choice
When you need reliable erosion and sediment control, you want something that’s built to last and won’t let you down.
Our silt fence is that solution, offering a mix of durability, functionality, and ease of use that’s hard to beat.
Silt Fence - 3' x 100' - 11 4 Foot Stakes Included
- Brand: Farm Plastic Supply
- Product Code: Silt-Fence-3x100
- Availability: In Stock
-
$35.99
Tags: silt fence


-74x74.jpg)


-74x74.jpg)
-74x74.jpg)

-74x74.jpg)
